The Distribution List module is used to create a spreadsheet for email
messages individually to members included on selected distribution lists.
The Communications
Maintenance node is used to create or modify the communication for the
specified distribution list.
Distribution List must be added to the Facility Group/Group Category
drop down list and the Group Type must be set to Global.
|
Field Name |
Details |
|
Communication Type |
This field defaults to Hampton. Click
the down arrow and select an item from the drop down list. (Currently,
the only item in the list will be Hampton.) |
|
Communication Name |
Type in the communication name. |
|
Communication Description |
Type in the communication description |
|
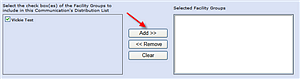
Facility Groups |
A list of facility groups is available to be added to the communication.
Click the
check box next to each of the facility groups that you want to add to
the communications. (NOTE:
You must
be a Responsible Person for a facility group before it will be displayed
in this list. The
Responsible Person can only be added in the Facility Groups module of
the smart client application.) |
|
Add button (Facility Groups) |
Click the Add button next to
the facility groups field to add the selected facility groups to the communication
(The information will be displayed in the Selected Facility Groups field,
but is not saved to the database until the Save button is clicked.)
|
|
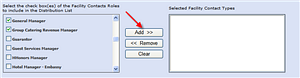
Contact Roles |
A list of contact roles is available to be added to the communication.
Click the
check box next to each role to be added to the communication. (NOTE:
Please
remember that the information for the facility, for the selected role
will only be included in the communication if the information exists in
OnQ PiM for this facility contact.) |
|
Add button (Contact Roles) |
Click the Add button next to
the contact roles list to add the selected roles to the communication
(The information will be displayed in the Selected Facility Contact Types
field, but is not saved to the database until the Save button is clicked.)
|
|
Field Name |
Details |
|
Communication Type |
This field defaults to Hampton. Click
the down arrow and select an item from the drop down list. (Currently,
the only item in the list will be Hampton.) |
|
Communication Name |
Type in the communication name. |
|
Communication Description |
Type in the communication description |
|
Facility Groups |
A list of facility groups is available to be added to the communication.
Click the
check box next to each of the facility groups that you want to add to
the communications. (NOTE:
You must
be a Responsible Person for a facility group before it will be displayed
in this list. The
Responsible Person can only be added in the Facility Groups module of
the smart client application.) |
|
Add button (Facility Groups) |
Click the Add button next to
the facility groups field to add the selected facility groups to the communication
(The information will be displayed in the Selected Facility Groups field,
but is not saved to the database until the Save button is clicked.)
|
|
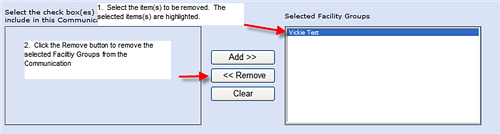
Remove button (Facility Groups) |
Click on an item in the Selected Facility Groups, then click the Remove button to remove the item from
the list. (The changes are not saved to the database until the Save button
is clicked.)
|
|
Clear button (Facility Groups) |
Click the Clear button to remove
ALL items from the Selected Facility Groups list at one time. (NOTE:
If you
click the clear button and you did not mean to, click the Cancel button
at the bottom of the page to cancel the changes you have made without
saving them to the database.) |
|
Contact Roles |
A list of contact roles is available to be added to the communication.
Click the
check box next to each role to be added to the communication. (NOTE:
Please
remember that the information for the facility, for the selected role
will only be included in the communication if the information exists in
OnQ PiM for this facility contact.) |
|
Add button (Contact Roles) |
Click the Add button next to
the contact roles list to add the selected roles to the communication
(The information will be displayed in the Selected Facility Contact Types
field, but is not saved to the database until the Save button is clicked.)
|
|
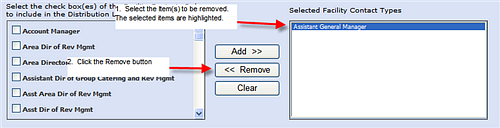
Remove button (Contact Roles) |
Click on an item in the Selected Facility Contact Types, then click
the Remove button to remove the
item(s) from the list. (The changes are not saved to the database until
the Save button is clicked.)
|
|
Clear button (Contact Roles) |
Click the Clear button to remove
ALL items from the Selected Facility Contact Types list at one time. (NOTE:
If you
click the clear button and you did not mean to, click the Cancel button
at the bottom of the page to cancel the changes you have made without
saving them to the database.) |